Trans: Latin prefix implying "across" or "Beyond", often used in gender nonconforming situations – Scend: Archaic word describing a strong "surge" or "wave", originating with 15th century english sailors – Survival: 15th century english compound word describing an existence only worth transcending.

Author: Jess (Page 6 of 10)

Intro to the AWS Cloud 9 IDE

The Cloud 9 IDE is the fastest way I have come up with to develop web-based or otherwise “connected” programs.    Because it lives on a Linux-based EC2 server on AWS, running different node, html, etc programs that rely on a network system just work- it is all already on a network anyway.   🙂  There is no downtime trying to figure out your WAMP, MAMP, Apache, or localhost situation.

Similarly, other network programs work just as well-  I am running a MySQL server over here (RDS), storage over there (S3), and have various bits in Github and locally.   Instead of configuring local editors, permissions, and computer ports and whatnot, you are modifying the VPC security policies and IAM groups- though generally, it just works.

Getting going:   The only prerequisite is you have an AWS account.  Students:  get $40 EC2 dollars below:

https://aws.amazon.com/education/awseducate/
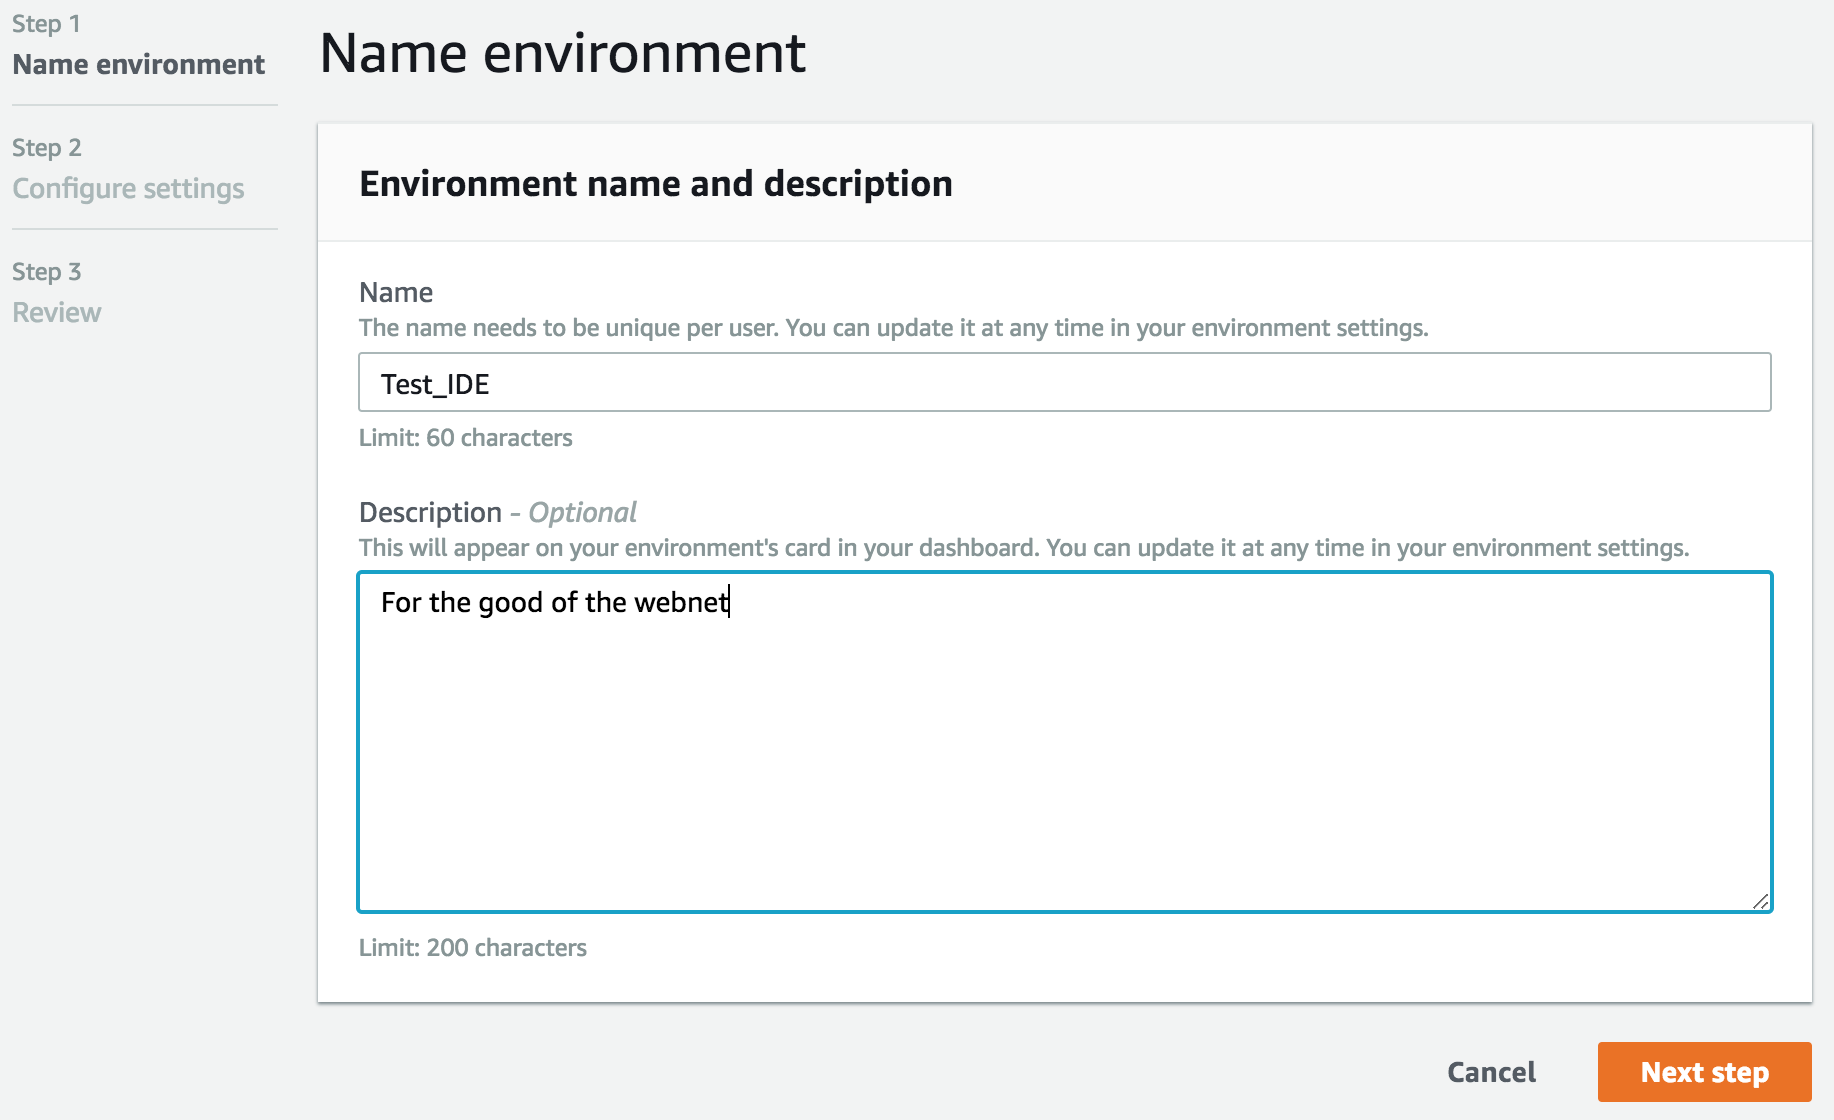
Open the cloud 9 tab under services.


Setup is very fast- just know if others are going to be editing to, understand the IAM policies and what VPC settings you actually want.


Know this ideally a browser-based service; I have tried to come up with a reason a SSH connection would be better and didn’t get any where.

For one person, micro is fine.   Know these virtual “RAMs” and “CPUs” are generous….


The default network settings are set up for you.   This follows good practice for one person; more than that (or if you are perhaps a far-travelling person) note these settings.  They are always editable under the VPC and EC2 instance tabs.


That’s it!   Other use things to know:

This is a linux machine maintained by Amazon.   Packages you think should work and be up to date (arguably like any other linux machine I guess…)  may not be.  Check your basics like the NPM installer and versions of what your going to be working on, it very well may be different than what you are used to.

In the editor:

You have two panels of workspace in the middle- shown is node and HTML.   Everything is managed by tabs- all windows can have as much stuff as you want this way.

Below there is a “runner” (shown with all the default options!) and a terminal window.  Off to the left is a generic file manager.


I hope this is useful, it sure is great for me.

-Jess

Using ESRI ArcGIS / ArcMap in the AWS Cloud

Selling AWS to… myself   🙂

Why struggle with underpowered local machines and VMs or watered-down web platforms for heavy lifting,  learning and work?

In addition to using ESRI software on mac computers, I am a big fan of the AWS WorkSpaces service (in addition to all their other developer tools, some of which are map-relevant: RDS for SQL and EC2 Redhat servers  for data management for example ).

Basically, for between ~$20 and ~$60 a month (Max, and not factoring in EDU discounts!), a user gets to use a well-oiled remote desktop.   You can download and license desktop apps like ArcMap and GIS products, file managers, and more from any computer connected to the internet.  This service is not very savvy; you make/receive a password and log right in.

A  big plus here of course is the Workspaces Application Manager (WAM); small sets of licenses can be administered in the same way desktops would, with extra easiness due to the “they are already really the same cloud thing any way”.

Another plus is any client- netbook, macbook, VM, etc- will work equally well.  In this regard it can be a very cheap way to get big data work done on otherwise insufficient machines.  Local storage and file systems work well with the client application, with the caveat being network speed.

🙂

https://docs.aws.amazon.com/workspaces/latest/adminguide/amazon-workspaces.html


Using ESRI ArcGIS / ArcMap on Mac OSX: 2 methods

Edit 07/26/2020:
Check out the expanded GIS notes page here!

Using ESRI ArcGIS / ArcMap on Macs: 2 methods

I need to run ESRI products on my MacBook Pro.   QGIS is always the prefered solution- open source, excellent free plugins, works on mac natively- but in a college / research environment, the only option that supports other people and school machines is ESRI.  Despite the annoying bureaucracy and expense of the software, some things are faster (but not better!) in ESRI, like dealing with raster / multiband data.

First, you need a license.

I went about this two ways;

My first solution was to buy an ESRI Press textbook on amazon.  A 180 day trial for $50- when taken as a college course, this isn’t to bad.  🙂   The book is slow and recursive, but a 180 days to play with all the plugins and whistles allows for way deeper learning via the internet.   🙂

Do know there is a little-documented limit to the number of license transfers you may perform before getting either lock in or out of your software.  I hit this limit, as I was also figuring out my virtual machine situation, which would occasionally need a re-installation.

My current solution is “just buy a student license”.   $100 per year is less than any adobe situation- so really not that bad.  

Now you need a windows ISO.  

https://www.microsoft.com/en-us/software-download/windows10ISO

Follow that link for the window 10, 64 bit ISO.  YOU DO NOT NEED TO BUY WINDOWS.  It will sometimes complain about not having an  authentication, but in the months of using windows via VMs, never have I been prohibited to do… anything.  When prompted for a license when configuring your VM, click the button that says "I don’t have a license".  Done.


Option one:  VirtualBox VM on a thumbdrive

https://www.virtualbox.org/wiki/Downloads – download for the VM software

http://a.co/4FEYMNY, http://a.co/hanHYl1 Suitable USBs.  the VM will take up most of a 128gb flash drive- ~70 gb just for windows and all the stuff you’ll want from a PC.  Add ESRI software and allocated space for a cache (where your GIS project works!), bigger is better.   Format all drives in disk utility as ExFat!  this is important, any other file system either won’t fly or could wreak havoc (other FAT based ones may have too small file allocations!

I used two drives, a 128 and a 64- this is great because I can store all my work on the 64, so I can easily plug it into other (school) machines running windows ArcMap and keep going, without causing issues with the massive VM in the 128.  

Installation is straightforward, just install EVERYTHING on the usb drive and it will be fine.   🙂

Problems:   Stability.   Crashes, and python / some other script modules do not work well.  This is a problem.  ArcAdministrator gets confused about all kinds of things- FWIW, if you are googling to delete the FLEXnet folder to solve authentication file issues, move to option 2 🙂

Speed is down, but actually the ~same speed as our school "super" PCs- (though I happened to know they are essentially glorified "hybrid" VMs too!) .

Option two: OSX Bootcamp 

https://support.apple.com/boot-camp

https://support.apple.com/en-us/HT201468

This way, you will hit "option/alt" each time you restart/boot your computer to choose from win/osx.   This is easy to install, as it is mac and mac = easy.

Big Caveat:  it is much harder to install windows externally  (on a usb, etc) from bootcamp.  I didn’t succeed in my efforts, but there could be a way….   The thing is, it really wants to run everything like a normal intel based PC, with all installations in the usual place.  This is good for the mac performance, but terrible for the tiny SSD hard drives we get as mac users.  I have a 256gb SSD.  I have an average of < 15 gb wiggle room here, and use every cloud service in the book.

If you need to manage your cloud storage because of a itsy mac SSD, my solution is still ODrive.   https://www.odrive.com/

I use Amazon cloud mostly with odrive, but I use a personal/school OneDrives, Dropboxes, Google,  etc.  with only the occasional hiccup.   Also, all of the AWS tools are great and cheap- EC2, S3, Cloud 9, lambda, RDS…. Great way to do your work outside of your mac via the internet.

Result:

ArcMap and GIS stuff is blazing fast on my modest 2015 i5/8gb macbook pro.  Comparing a huge, mega ATX+ school computer to my mac on boot camp, I am running large raster filtering operations significantly quicker than other folks doing the same type of work.   That is GOOD.

🙂

-Jess

How to make a AWS R server

When you need an R server and have lots of data to process, AWS is a great way to go.   Sign up of the free tier and poke around!

Creating an AWS Rstudio server:

https://aws.amazon.com/blogs/big-data/running-r-on-aws/ – using both the R snippet (works but the R core bits are NOT present and it will not work yet) and the JSON snippet provided  

https://www.rstudio.com/products/rstudio/download-server/ – the suite being installed

Follow most of the AWS blog AMI info, with the following items:

AMI:  Amazon Linux 2 (more packages and extras v. standard)  

  • t2.micro (free tier)
  • IAM policy follows AWS blog JSON snippet
  • Security Policy contains open inbound ports 22, 8787, 3838 (the latter two for R server specific communication)
  • Append user, username:password in the blog post’s initial r studio install text (pasted into the “advanced” text box when completing the AMI setup


SSH into the EC2 instance

sudo yum install –y https://dl.fedoraproject.org/pub/epel/epel-release-latest-7.noarch.rpm

sudo yum-config-manager –enable epel

sudo yum repolist

wget https://download2.rstudio.org/rstudio-server-rhel-1.1.423-x86_64.rpm

sudo yum update -y

sudo yum install -y R

sudo rstudio-server verify-installation


Access the graphical R server:

In a web browser, tack on “:8787” to the end of the Instance’s public “connect” link.  If it doesn’t load a login window (but seems to be trying to connect to something) the security policy is probably being overzealous……..


Notes on S3-hosted data:

  • S3 data is easiest to use if it is set to be public.
  • There are s3-specific tools for R, accessible as packages from CRAN directly from the R interface
  • Note data (delimited text at least) hosted in S3 will behave differently than it does locally, e.g. spaces, “na”, “null” need to be “cleaned” in R before use.  


There we have it!


-Jess

DIY CMoy headphone Amp, point to point: worth it?


This is an extraordinarily simple headphone amp, and has essentially reached legendary/history status at this point.  I decided to build the original design (there are countless mods and totally different amps that hark back to this one), though opting for a wall-wart desk form factor instead of the original 9v battery tin.


I am building from the the 2008 “williamneo” blog post, as I like that point to point layout of his.  (I also could not easily procure the now ancient radioshack proto board- yes, the one shaped like a crab)  🙂

References:

http://williamneo.blogspot.com/2008/01/diy-cmoy-headphone-amplifier-for.html

https://tangentsoft.net/audio/cmoy/


opting for a desktop form-factor and 12 volts, my little amp works fine for easy to drive headphones…. But does it actually sound better than, say, an iphone?


The truth is, while it gets much louder than a phone, the OPA jfet op amp powering the whole thing is simply NOT high end.  it will distort with too much input (after a few clicks on a phone before the phone is maxed out for reference- well below standard line/”dac” level in both home and pro audio voltage wise) and will incrementally break up with hard/loud songs on bigger headphones, as the volume and rocking out goes up- in my case, the current fostex RP evolution I have been mangling is the big cheese candidate.  the planar drivers in the RP series are definitely “very hard” to drive in the scheme of things, but anything “heavy weight” will simply not do when pushed to an accessible limit.  I CAN use smaller dynamic/efficient  headphones with ease, such as my ported and open hifiman edition S without experiencing distortion.  Still here though, it is clear this amp is a “diy/cheap access to power”- slated against the fiio e12 for example, the CMOY seems a bit…. Loose?  Not any better, that is fore sure!  (granted, the e12 is a fantastic budget amp)


Note of op amps:   the NTE and other non-OPA brand-name look alikes and electrical analogues sound terrible.  I was fussing around with the NTE variants after needing the short out resistors “R5” (very important when building:  do not use R5) when they actually blew out from my using a inversely-poled power supply by accident, and was getting frustrated as the amp was working but sounded like a making TIDAL streaming gurgle out from a cheese grater.  eventually, after a ebay shipment of brand name OPAs came, I popped one in cautiously and it turned out the opamp was the source of the…. cheese grating.

In all, a good project for skill building but falls short of anything “hifi”.

-Jess

My Fragile-Bodied Guide Scooter Safety

I like scootering.  I like riding and learning tricks so much I think it it safe to say 94% of all my major injuries occur from skatepark mishaps….  Which is part of the reason I really don’t ride much anymore, because there is an extraordinarily good chance I am either still recovering from some injury from last time or am still certain I will surely break something again and am not ready for that extra burden of healing just yet.  🙂

Below is my (in process) Fragile-Bodied Guide Scooter Safety.

-Jess

Continue reading

Birding Beyond Binos: Find eBird Data for Fun!

eBird is an indispensable tool for the modern, savvy birder.  It even rolls with my lingo on the home page:

Birding in the 21st Century!  What’s not to like?

There are a number of key parts to the ebird experience as a viewer, only a few of which I will cover on this page.

The two most essential parts of ebird include the ability to learn about and enjoy birds when we can’t get out into the field, and know where to go/what to expect when we can.

The first objective is fulfilled with the “Species Maps” button under the “Explore Data” tab.
This tool allows us to find and track birds and their friends (such as “migrant warblers”) around the world.   This is a great way to get a handle on migrations, local owls (owls are great!) and other species that can otherwise “fly under your radar”.


Here, with the species tab open, I tell eBird I want to know the whereabouts of the blackburnian warblers.  


Instead of showing me all the individual sightings ever, I specify this month range (Aug-Nov) and the last ten years option.

It turns out they are all over the place right now, having migrated up the eastern seaboard.    So…

…Using the next date range (you can be more specific than I) we can see where they migrate on the south-end of things.


Below:

Wow!!  they are all pretty much in South America, as our frosty winter has set in here in the north.  

As you may well imagine, this is an amazing tool to discover patterns and predict when birds may arrive and depart, letting us effectively, “bird from home”.

Not a problem!


The second objective is equally simple with eBird: what can we expect from a location, bird wise?


Using the “Explore Hotspots” tab now, I can search for my local county.  YMMV on what criteria you will need, be it city, county, etc. 

All these little upside-down pears show up.  Similar to the first foray, we can specify dates from the dropdown tab- but really, just use the right hand button and specify “Past Week” or “Past Month” (as I have done here).   Now, the color code represents recent activity!   plan your trip and pack your bags!

I hope this is helpful breaking the ice into the world of eBird- it really fires up your birding lifestyle and ability!

-Jess

Gallery of “Warblers in the Hand”


MPCNC: It moves!

These are some photos of the current MPCNC project coming alive in the Sulliwood basement. The MPCNC is a (relatively) low cost, 3d printed CNC (computer numerical control=does stuff by itself)- featured here is the spindle (actually a drywall cutter) and a mashup mk8-style extruder. Below, you can see what I see before it is cutting time in the CAM module of Fusion 360. That object is half of a “trial run” pottery stand for someone’s art show….

The MPCNC awakens!

Patchwork MPCNC extruder and hot end…

Double-sided MPCNC gcode, just for the holder part…..


…For this design:

Birding Beyond Binos: 5 Bird apps vs. “the Guide”.

We all have a favorite bird, animal or plant guide.  Peterson is the best at drawing; Sibley takes the best pictures.  Kauffman ties it all together; National Geographic makes a solid reference and Audubon is great for fast looks.

While these books will always have a place on the shelf or table, the depth of content and portability of smartphone apps and trustworthy (e.g. reaserch related or associated with a big bird organization you recognize) websites truly foster the next level of ecological acuity.

[I will cover apps for iPhones and iPads- these are tools I have available and find to be indispensable.]  Like the shelf of guides they can replace out in the field, there is always room for another guide- and, generally speaking, cost significantly less than the least expensive print guide on your shelf.

  1. iBird PRO –

This app does it all: view photos, range maps, sounds, and similar birds, and search by band code, Latin/common name.  The sound recordings are pretty good and can be looped individually or as a species playlist (good for playback in research situations).  Similar bird songs are playable at the bottom of each species- great for learning and verifying nuances between similar songs.  The illustrations are “ok”- better than what I could do (obviously) but nothing quite like Peterson or Kauffman.  There are two more (add-on) engines in this app I have not used:  the local birds function by GPS (BAM) and a “humanized” search tool to pinpoint the bird you are looking for (Percevia).

  1. Audubon Birds

Audubon Birds has come a long way, and generally will offer more of a comprehensive written overview on each bird- going into feeding, behavior, breeding, and habitat discussions.  They seem to have added eBird integration (far, far superior to their “nature share” tool) which allows for both a mobile search into the unfathomably large user-based data set for local birds and a way to add your own data to eBird (though traditionally, the best way to do that is from a computer).

  1. Audubon Owls

This app is only a small vignette on owls; there seems to be more info geared solely about owls here than in Audubon Birds- photos, videos, tips, and tricks

  1. Merlin Bird ID

Despite the hardcore Bird Photo ID algorithms and location-based searches, this is geared toward those who may be starting out, and want to up the ante.  You fill in a few parameters about a bird sighting (this will not help with bird sounds), then it will generate a list of probable birds.  Supposedly, if you get a good photo of the bird on your phone (Digi scoping/Wi-Fi upload?) It can id the bird visually.

  1. eBird

If you are truly doing an eBird list for your trip, try this app for basic, quick additions- but I would not rely on it for media uploads or anything too crazy.  You can upload your checklist from the field then edit it later, though it is unclear if that is really a good idea in the scheme of data collection.

This is a list of the Bird apps I use on my phone, most getting use many times a week or even every day (iBird Pro).

-Jess

Rugby Morning #3.6

…During #3 I got demolished by biting insects- “.6” times later I had purchased and applied a significant DEET and re-entered the fray!

-Jess

Rugby Morning #2

Guess where I went this morning?

Breaking in the new spot.  Additionally, I saw Magnolia, Yellow, and Common Yellowthroat warblers, and heard Black Throated Blue and Green warblers.  Veery, Hermit, and  Ovenbird thrushes were around, in addition to catbirds.

-Jess

« Older posts Newer posts »

© 2024 Trans Scend Survival

α wιρ Σ ♥ by Jess SullivanUp ↑